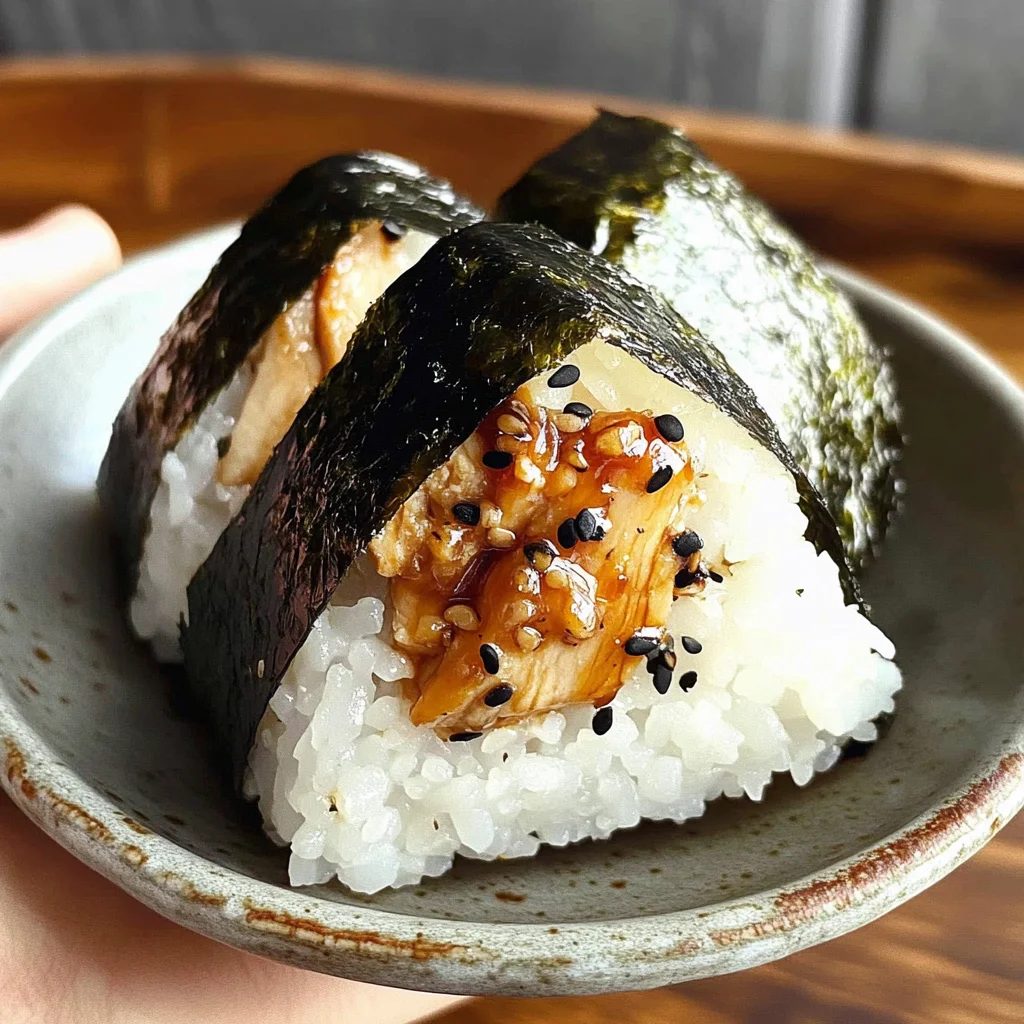
This Chicken Onigiri recipe is a delightful combination of savory teriyaki chicken and fluffy sushi rice, making it perfect for any occasion. Whether you’re preparing a quick snack, packing a lunch, or impressing guests at a gathering, these onigiri are sure to please. Their unique triangle shape and classic Japanese flavors set them apart from typical snacks.

Jump to:
- Why You’ll Love This Recipe
- Tools and Preparation
- Essential Tools and Equipment
- Importance of Each Tool
- Ingredients
- For the Rice
- For the Filling
- For Wrapping
- How to Make Chicken Onigiri
- Step 1: Prepare the Sushi Rice
- Step 2: Marinate the Chicken
- Step 3: Make Teriyaki Sauce
- Step 4: Cook the Chicken
- Step 5: Add Flavorings
- Step 6: Shape the Onigiri
- How to Serve Chicken Onigiri
- With a Side of Soy Sauce
- Serve with Pickled Vegetables
- Accompanied by Miso Soup
- Pair with Edamame
- Enjoy with Seaweed Salad
- How to Perfect Chicken Onigiri
- Best Side Dishes for Chicken Onigiri
- Common Mistakes to Avoid
- Storage & Reheating Instructions
- Refrigerator Storage
- Freezing Chicken Onigiri
- Reheating Chicken Onigiri
- Frequently Asked Questions
- What is Chicken Onigiri?
- How do I make Chicken Onigiri?
- Can I customize my Chicken Onigiri?
- How long does it take to prepare Chicken Onigiri?
- Can I make Chicken Onigiri ahead of time?
- Final Thoughts
- 📖 Recipe Card
Why You’ll Love This Recipe
- Quick and Easy: This chicken onigiri can be prepared in just 45 minutes, making it an ideal choice for busy days.
- Flavorful Filling: The teriyaki chicken filling bursts with flavor, ensuring each bite is delicious.
- Customizable: You can swap out the filling or add different toppings to cater to your taste preferences.
- Fun to Make: Shaping the onigiri is an enjoyable activity that can involve family and friends.
- Great for Meal Prep: These onigiri are perfect for meal prep; they store well and make excellent grab-and-go options.
Tools and Preparation
Before you get started, gather the necessary tools to streamline your cooking process. Having the right equipment makes the preparation easier and more efficient.
Essential Tools and Equipment
- Nonstick pan
- Mixing bowls
- Rice cooker (optional)
- Measuring cups and spoons
- Plastic wrap (optional)
Importance of Each Tool
- Nonstick pan: Prevents sticking while cooking the chicken, ensuring even cooking and easy cleanup.
- Mixing bowls: Essential for combining ingredients effectively without mess.
Ingredients
This chicken onigiri is tasty and really easy to make. I made a simple teriyaki chicken filling from chicken drumstick meat.
For the Rice
- 4 cups cooked sushi rice
- 1/2 teaspoon salt (make sure it is fine salt so it can distribute better in the rice)
- 2 tablespoons furikake (optional)
For the Filling
- 1/2 pound boneless skinless chicken meat (I used drumsticks)
- 2 teaspoons soy sauce
- 1 tablespoon sake (or water)
- 1/4 teaspoon baking soda
- 1 teaspoon cornstarch
- 1 ½ tablespoons soy sauce
- 1 tablespoon mirin
- 1 tablespoon brown sugar (firmly packed)
- 1 tablespoon oil
- 1 tablespoon minced garlic
For Wrapping
- 1 sheet nori (cut into small rectangles)
How to Make Chicken Onigiri
Step 1: Prepare the Sushi Rice
After cooking the sushi rice, mix it with 1/2 a teaspoon of salt and 2 tablespoons of furikake. It’s best to incorporate furikake directly into the rice for optimal flavor distribution.
Step 2: Marinate the Chicken
Cut the chicken meat into small pieces. Transfer it to a bowl with the remaining marinade ingredients. Mix until combined, then refrigerate for 30 minutes to allow the flavors to meld.
Step 3: Make Teriyaki Sauce
In a small bowl, combine all teriyaki sauce ingredients.
Step 4: Cook the Chicken
Heat 1 tablespoon of oil in a large nonstick pan over medium-high heat. Add the marinated chicken and cook for about 2–3 minutes until fully cooked through.
Step 5: Add Flavorings
Reduce heat to medium. Add minced garlic and cook for about 30 seconds. Then add the teriyaki sauce mixture, continuing to cook until it thickens into a glaze. Remove from heat once done.
Step 6: Shape the Onigiri
To wrap your onigiri, wet your hands with water. Scoop 1/3 cup of rice into your palm, creating a small well in the center. Fill this well with approximately 1 tablespoon of cooked chicken filling. Top with another scoop of rice (another 1/3 cup) to cover the filling completely. Use your hands to shape everything into a triangle form. Finally, wrap with a strip of nori for added flavor and texture.
Enjoy your homemade Chicken Onigiri!
How to Serve Chicken Onigiri
Chicken onigiri is a versatile dish that can be enjoyed in various ways. Whether as a snack, part of a meal, or an appetizer, here are some creative serving ideas.
With a Side of Soy Sauce
- A small dish of soy sauce enhances the umami flavor of chicken onigiri. Dip each bite for added taste.
Serve with Pickled Vegetables
- Pickled vegetables provide a crunchy texture and tangy flavor that balances the savory chicken filling.
Accompanied by Miso Soup
- A warm bowl of miso soup complements the rice and chicken, creating a comforting meal perfect for any time of day.
Pair with Edamame
- Steamed edamame adds protein and fiber to your meal while being easy to prepare. Simply sprinkle with salt before serving.
Enjoy with Seaweed Salad
- The fresh and slightly sweet taste of seaweed salad pairs beautifully with the flavors in chicken onigiri.
How to Perfect Chicken Onigiri
Making perfect chicken onigiri involves attention to detail. Here are some tips to ensure your onigiri turn out great every time.
- Use fresh ingredients: Fresh chicken and quality sushi rice elevate the overall flavor.
- Properly season the rice: Mixing in salt and furikake makes the rice more flavorful, enhancing every bite.
- Shape carefully: Wetting your hands prevents sticking and helps shape the onigiri into perfect triangles.
- Allow marination time: Letting the chicken marinate allows flavors to penetrate deeply for better taste.
- Watch cooking times: Overcooking can dry out your chicken. Cook until just done for juicy meat.
- Experiment with fillings: Try different fillings like vegetables or fish for variety in flavor and texture.
Best Side Dishes for Chicken Onigiri
Chicken onigiri is delightful on its own, but pairing it with side dishes can elevate your meal. Here are some excellent options to consider.
- Tempura Vegetables: Lightly battered and fried veggies add crunch and flavor that complements the soft onigiri.
- Japanese Potato Salad: Creamy potato salad provides a rich contrast to the savory rice balls.
- Tonkatsu: This crispy pork cutlet serves as a hearty side that pairs well with the lightness of onigiri.
- Cucumber Sunomono: This refreshing cucumber salad offers a tangy crunch that balances out the richness of chicken.
- Gyoza: These pan-fried dumplings filled with meat or veggies make for a satisfying addition to your meal.
- Nasu Dengaku: Grilled eggplant with miso glaze adds depth of flavor and is an ideal vegetarian option alongside chicken onigiri.
Common Mistakes to Avoid
Making Chicken Onigiri can be simple, but a few common mistakes might lead to less-than-perfect results. Here are some tips to help you get it right.
- Using the wrong rice: Not using sushi rice can affect texture and taste. Always opt for short-grain sushi rice for the best results.
- Skipping the seasoning: Forgetting to season the rice with salt can make your onigiri bland. Ensure you mix in fine salt after cooking the rice.
- Overfilling onigiri: Adding too much filling can cause your onigiri to fall apart. Stick to about 1 tablespoon of filling for each piece.
- Not wetting your hands: Failing to wet your hands before shaping can make the rice stick and difficult to mold. Always keep a bowl of water nearby for this purpose.
- Ignoring resting time: Rushing through without letting the onigiri sit can affect their shape. Allow them to rest for a few minutes after shaping.
Storage & Reheating Instructions
Refrigerator Storage
- Store Chicken Onigiri in an airtight container.
- They will last up to 2 days in the refrigerator.
Freezing Chicken Onigiri
- Wrap each onigiri individually in plastic wrap or foil.
- Place them in a freezer-safe bag or container, where they can be stored for up to 1 month.
Reheating Chicken Onigiri
- Oven: Preheat oven to 350°F (175°C). Place onigiri on a baking sheet and heat for about 10-15 minutes until warm.
- Microwave: Place onigiri on a microwave-safe plate, cover with a damp paper towel, and heat for 30-60 seconds.
- Stovetop: Heat a nonstick pan over medium heat, add a little oil, and cook each side of the onigiri for about 2-3 minutes until heated through.
Frequently Asked Questions
What is Chicken Onigiri?
Chicken Onigiri is a delightful Japanese rice ball filled with flavorful teriyaki chicken. It’s portable, making it perfect as a snack or light meal.
How do I make Chicken Onigiri?
To make Chicken Onigiri, prepare sushi rice and fill it with marinated teriyaki chicken. Shape it into triangles and wrap with nori for added flavor.
Can I customize my Chicken Onigiri?
Absolutely! You can change the filling by using different proteins like tofu or vegetables, or add spices for extra flavor.
How long does it take to prepare Chicken Onigiri?
The total time to prepare Chicken Onigiri is about 45 minutes, including cooking and assembling.
Can I make Chicken Onigiri ahead of time?
Yes! You can prepare them in advance and store them in the refrigerator or freezer for later enjoyment.
Final Thoughts
Chicken Onigiri offers a tasty combination of flavors that are sure to please everyone. It’s versatile too; you can customize the fillings based on your preferences. Give this recipe a try; you won’t be disappointed!
Did You Enjoy Making This Recipe? Please rate this recipe with ⭐⭐⭐⭐⭐ or leave a comment.
📖 Recipe Card
Print
Chicken Onigiri
- Total Time: 45 minutes
- Yield: Makes approximately 6 servings 1x
Description
Chicken Onigiri is a delightful Japanese treat that combines fluffy sushi rice with savory teriyaki chicken, making it an ideal snack or light meal. Perfectly shaped into convenient triangles and wrapped in nori, these rice balls are not only easy to prepare but also incredibly satisfying. Whether you’re enjoying them as part of a packed lunch or serving them at a gathering, Chicken Onigiri offers a burst of flavor in every bite. With customizable fillings and toppings, you can tailor this recipe to suit your taste preferences. Quick and fun to make, it’s an excellent choice for busy days or impressing guests with authentic Japanese cuisine.
Ingredients
- 4 cups cooked sushi rice
- 1/2 pound boneless skinless chicken (drumsticks recommended)
- Soy sauce, sake, mirin
- Brown sugar, garlic
- Nori (seaweed) for wrapping
Instructions
- Prepare sushi rice by mixing it with salt and furikake after cooking.
- Cut the chicken into small pieces and marinate with soy sauce, sake, baking soda, cornstarch, brown sugar, and garlic for 30 minutes.
- Cook marinated chicken in a nonstick pan until fully cooked; add teriyaki sauce until it thickens.
- Shape onigiri: Wet hands, scoop rice into palm, create a well for the chicken filling, cover with more rice, shape into triangles, and wrap with nori.
- Prep Time: 20 minutes
- Cook Time: 25 minutes
- Category: Snack
- Method: Cooking
- Cuisine: Japanese
Nutrition
- Serving Size: 1 serving
- Calories: 220
- Sugar: 2g
- Sodium: 450mg
- Fat: 5g
- Saturated Fat: 1g
- Unsaturated Fat: 3g
- Trans Fat: 0g
- Carbohydrates: 33g
- Fiber: 1g
- Protein: 12g
- Cholesterol: 45mg