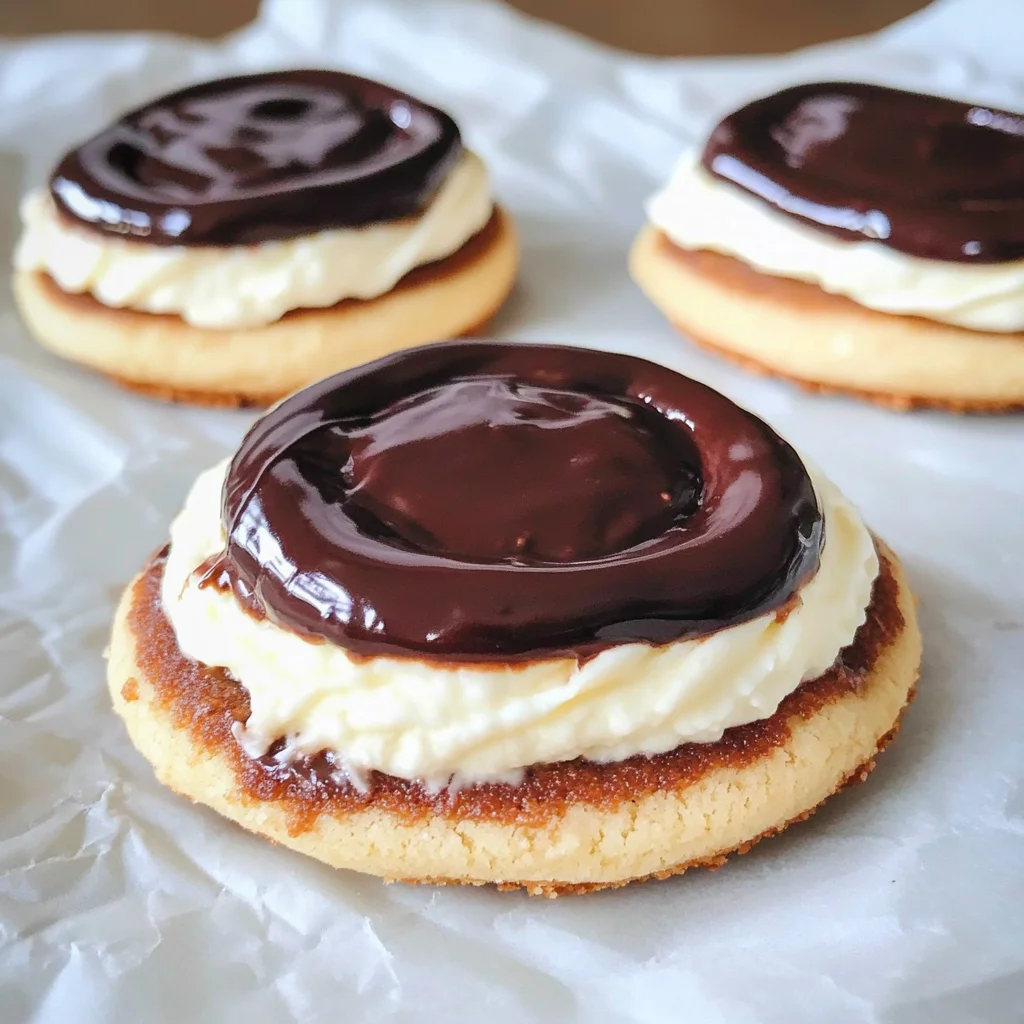
Enjoy the delicious combination of soft, buttery cookies filled with whipped cream and topped with rich chocolate glaze. Boston Cream Pie Cookies: A Delicious Twist on a Classic Dessert are a delightful treat perfect for any occasion! These cookies blend the traditional flavors of Boston Cream Pie into a fun, portable format that everyone will love.
Jump to:
- Why You’ll Love This Recipe
- Tools and Preparation
- Essential Tools and Equipment
- Importance of Each Tool
- Ingredients
- For the Cookies:
- For the Whipped Cream Filling:
- For the Chocolate Glaze:
- How to Make Boston Cream Pie Cookies: A Delicious Twist on a Classic Dessert
- Step 1: Cream Butter and Sugar
- Step 2: Add Eggs and Vanilla
- Step 3: Combine Dry Ingredients
- Step 4: Chill Dough
- Step 5: Prepare Whipped Cream Filling
- Step 6: Keep Filling Cool
- Step 7: Preheat Oven
- Step 8: Shape Cookies
- Step 9: Bake Cookies
- Step 10: Cool Cookies
- Step 11: Melt Chocolate
- Step 12: Cool Chocolate
- Step 13: Assemble Cookies
- Step 14: Repeat Assembly
- Step 15: Glaze Cookies
- Step 16: Set Cookies
- How to Serve Boston Cream Pie Cookies: A Delicious Twist on a Classic Dessert
- Cookie Sandwiches
- Chocolate Drizzle
- Ice Cream Pairing
- Coffee or Tea
- Decorative Platter
- Individual Treat Bags
- How to Perfect Boston Cream Pie Cookies: A Delicious Twist on a Classic Dessert
- Best Side Dishes for Boston Cream Pie Cookies: A Delicious Twist on a Classic Dessert
- Common Mistakes to Avoid
- Storage & Reheating Instructions
- Refrigerator Storage
- Freezing Boston Cream Pie Cookies: A Delicious Twist on a Classic Dessert
- Reheating Boston Cream Pie Cookies: A Delicious Twist on a Classic Dessert
- Frequently Asked Questions
- What makes Boston Cream Pie Cookies different?
- Can I customize the filling?
- How do I prevent my cookies from spreading?
- Can I make these cookies gluten-free?
- How long do these cookies last?
- Final Thoughts
- 📖 Recipe Card
Why You’ll Love This Recipe
- Easy to Make: With simple ingredients and straightforward steps, baking these cookies is a breeze, even for beginners.
- Irresistible Flavor: Enjoy the rich combination of buttery cookies, creamy filling, and decadent chocolate glaze that will satisfy your sweet tooth.
- Perfect for Any Occasion: Whether it’s a birthday party, holiday gathering, or simply an afternoon treat, these cookies fit right in.
- Customizable: Feel free to experiment with different fillings or toppings; you can make your own twist on this classic dessert!
- Great for Sharing: With 24 cookies in one batch, they’re perfect for sharing with friends and family.
Tools and Preparation
Before diving into making these delightful cookies, gather your essential tools. Having everything ready will streamline the cooking process.
Essential Tools and Equipment
- Electric mixer
- Mixing bowls
- Cookie scoop or tablespoon
- Baking sheets
- Parchment paper
- Microwave-safe bowl
- Wire rack
Importance of Each Tool
- Electric mixer: Makes creaming butter and sugar quick and efficient, ensuring a light and fluffy texture.
- Mixing bowls: Necessary for combining ingredients separately before mixing; helps avoid overmixing.
- Cookie scoop: Ensures uniform cookie sizes for even baking and presentation.
- Wire rack: Allows cookies to cool properly after baking, preventing sogginess.
Ingredients
Enjoy the delicious combination of soft, buttery cookies filled with whipped cream and topped with rich chocolate glaze. These Boston Cream Pie Cookies are a delightful treat perfect for any occasion!
For the Cookies:
- 1 cup unsalted butter, softened
- 1 cup granulated sugar
- 2 large eggs
- 1 teaspoon vanilla extract
- 2 cups all-purpose flour
- 1 teaspoon baking powder
- 1/2 teaspoon baking soda
- 1/4 teaspoon salt
For the Whipped Cream Filling:
- 1 cup heavy cream
- 1/2 cup powdered sugar
- 1 teaspoon vanilla extract (for the cream filling)
For the Chocolate Glaze:
- 1 cup semi-sweet chocolate chips
- 1 tablespoon vegetable oil
How to Make Boston Cream Pie Cookies: A Delicious Twist on a Classic Dessert
Step 1: Cream Butter and Sugar
In a large mixing bowl, cream together the softened butter and granulated sugar using an electric mixer on medium speed. Beat until the mixture is light and fluffy, about 3-4 minutes.
Step 2: Add Eggs and Vanilla
Add the eggs, one at a time, mixing well after each addition. Stir in the vanilla extract until fully combined.
Step 3: Combine Dry Ingredients
In a separate bowl, whisk together the all-purpose flour, baking powder, baking soda, and salt. Gradually add this dry mixture to the wet ingredients, mixing on low speed until just combined. Avoid overmixing.
Step 4: Chill Dough
Cover the bowl with plastic wrap and refrigerate for at least 30 minutes.
Step 5: Prepare Whipped Cream Filling
In a medium bowl, pour the heavy cream and add the powdered sugar and vanilla extract. Using a hand mixer, whip the cream until stiff peaks form, about 3-5 minutes. Avoid overwhipping.
Step 6: Keep Filling Cool
Set the cream filling aside in the refrigerator to keep it cool and firm.
Step 7: Preheat Oven
Preheat your oven to 350°F (175°C) and line two baking sheets with parchment paper.
Step 8: Shape Cookies
Use a cookie scoop or tablespoon to drop rounded balls of dough onto the prepared baking sheets, spacing them about 2 inches apart.
Step 9: Bake Cookies
Bake for 10-12 minutes or until the edges are lightly golden. The centers may look slightly underbaked.
Step 10: Cool Cookies
Allow the cookies to cool on the baking sheets for about 5 minutes before transferring them to a wire rack to cool completely.
Step 11: Melt Chocolate
In a microwave-safe bowl, combine the semi-sweet chocolate chips and vegetable oil. Microwave in 30-second intervals, stirring in between until melted and smooth—about 1-2 minutes total.
Step 12: Cool Chocolate
Let the chocolate cool slightly before glazing the cookies.
Step 13: Assemble Cookies
Take one cookie and place a generous dollop of whipped cream filling on its flat side. Top with another cookie (flat side down) to create a sandwich. Gently press down to spread filling to edges.
Step 14: Repeat Assembly
Repeat with remaining cookies and cream filling until all are assembled.
Step 15: Glaze Cookies
Drizzle or dip assembled cookies in melted chocolate glaze; allow excess to drip off.
Step 16: Set Cookies
Place glazed cookies on a wire rack to set before serving enjoy your delicious Boston Cream Pie Cookies!
How to Serve Boston Cream Pie Cookies: A Delicious Twist on a Classic Dessert
Serving Boston Cream Pie Cookies can elevate any gathering or special occasion. These delightful cookies are not only tasty but also visually appealing, making them perfect for sharing. Here are some creative serving suggestions to enhance your dessert experience.
Cookie Sandwiches
- Create cookie sandwiches by adding extra whipped cream filling between two cookies. This adds an indulgent layer and a fun twist to the classic cookie.
Chocolate Drizzle
- Enhance the presentation by drizzling additional melted chocolate over the assembled cookies. This adds a gourmet touch and makes them even more visually enticing.
Ice Cream Pairing
- Serve these cookies alongside a scoop of vanilla or chocolate ice cream. The combination of creamy ice cream and soft cookies is sure to impress your guests.
Coffee or Tea
- Pair these cookies with a cup of coffee or tea for a delightful afternoon treat. The rich flavors of the cookies complement hot beverages perfectly.
Decorative Platter
- Arrange the cookies on a decorative platter, garnished with fresh berries or mint leaves. This not only looks beautiful but also adds a refreshing element to the serving.
Individual Treat Bags
- Package individual cookies in clear bags tied with ribbon for party favors. This makes for a lovely take-home gift that guests will appreciate.

How to Perfect Boston Cream Pie Cookies: A Delicious Twist on a Classic Dessert
Perfecting Boston Cream Pie Cookies is all about attention to detail and technique. Follow these tips to ensure your cookies are the best they can be.
- Chill the Dough: Refrigerating the dough helps prevent spreading during baking, leading to thicker and softer cookies.
- Use Room Temperature Ingredients: Ensure butter and eggs are at room temperature for better incorporation, resulting in a uniform texture.
- Don’t Overmix: Mix until just combined after adding dry ingredients. Overmixing can result in tough cookies.
- Check Oven Temperature: Use an oven thermometer to verify that your oven is accurate. Baking at the correct temperature is crucial for achieving perfect cookies.
- Cool Before Assembling: Allow cookies to cool completely before assembling them with whipped cream filling to prevent melting.
- Experiment with Flavors: Feel free to add different flavor extracts or spices to your dough for unique variations on this classic recipe.
Best Side Dishes for Boston Cream Pie Cookies: A Delicious Twist on a Classic Dessert
While Boston Cream Pie Cookies shine on their own, pairing them with side dishes can create a well-rounded dessert experience. Here are some delicious options to consider.
- Fresh Berries: Strawberries, raspberries, or blueberries provide a burst of freshness that balances the richness of the cookies.
- Vanilla Ice Cream: A classic pairing, vanilla ice cream complements the flavors of the cookies and adds creaminess.
- Chocolate Mousse: This light yet indulgent dessert pairs beautifully with Boston Cream Pie Cookies, enhancing their chocolatey goodness.
- Whipped Cream: Serve extra whipped cream on the side for those who want an even creamier experience when enjoying their cookies.
- Fruit Salad: A lightly sweetened fruit salad offers freshness that contrasts nicely with rich desserts like these cookies.
- Coffee Cake: Pairing these cookies with coffee cake creates an enjoyable brunch or afternoon tea spread.
- Cheesecake Bites: Mini cheesecake bites add another layer of decadence, making for an impressive dessert table.
- Mint Chocolate Chip Ice Cream: The mint flavor adds complexity and refreshment that pairs wonderfully with chocolate desserts like Boston Cream Pie Cookies.
Common Mistakes to Avoid
When making Boston Cream Pie Cookies, it’s easy to stumble into a few common pitfalls. Here are some mistakes to avoid for the best results.
- Skipping the Chilling Step: Not refrigerating the dough can lead to cookies that spread too much while baking. Always chill the dough for at least 30 minutes before baking.
- Overmixing the Dough: Mixing the dough too long can make your cookies tough instead of soft and tender. Mix until just combined for the best texture.
- Not Measuring Ingredients Correctly: Using too much or too little of an ingredient can ruin your cookies. Use measuring cups and spoons for accuracy.
- Ignoring Baking Time: Baking cookies for too long can dry them out. Keep an eye on them and take them out when edges are lightly golden.
- Forgetting to Cool Before Glazing: Glazing hot cookies can cause the chocolate to melt off. Allow cookies to cool completely before adding the glaze.
Storage & Reheating Instructions
Refrigerator Storage
- Store Boston Cream Pie Cookies in an airtight container.
- They will keep well in the refrigerator for up to 5 days.
Freezing Boston Cream Pie Cookies: A Delicious Twist on a Classic Dessert
- Freeze these cookies in a single layer on a baking sheet first.
- Once frozen, transfer them to a freezer-safe container or bag for up to 3 months.
Reheating Boston Cream Pie Cookies: A Delicious Twist on a Classic Dessert
- Oven: Preheat to 350°F (175°C) and warm cookies for about 5-7 minutes until soft.
- Microwave: Heat one cookie at a time on low power for about 10-15 seconds.
- Stovetop: Warm in a skillet over low heat, flipping once until heated through.
Frequently Asked Questions
Here are some common questions people have about Boston Cream Pie Cookies.
What makes Boston Cream Pie Cookies different?
Boston Cream Pie Cookies offer a unique twist by combining cookie texture with classic cream pie flavors, featuring whipped cream filling and chocolate glaze.
Can I customize the filling?
Absolutely! You can use flavored whipped cream or even swap it with pastry cream for added richness in your Boston Cream Pie Cookies.
How do I prevent my cookies from spreading?
Make sure your dough is well-chilled before baking, and avoid overmixing during preparation.
Can I make these cookies gluten-free?
Yes! Substitute all-purpose flour with gluten-free flour blends designed for baking to enjoy gluten-free Boston Cream Pie Cookies.
How long do these cookies last?
Stored properly in an airtight container, they last about 5 days in the refrigerator or up to 3 months in the freezer.
Final Thoughts
Boston Cream Pie Cookies are not only delicious but also versatile. Their delightful combination of soft cookie, creamy filling, and rich chocolate glaze makes them perfect for any occasion. Feel free to customize with different fillings or toppings, and don’t hesitate to share them at your next gathering!
Did You Enjoy Making This Recipe? Please rate this recipe with ⭐⭐⭐⭐⭐ or leave a comment.
📖 Recipe Card
Print
Boston Cream Pie Cookies: A Delicious Twist on a Classic Dessert
- Total Time: 42 minutes
- Yield: Approximately 24 cookies 1x
Description
Indulge in the delightful experience of Boston Cream Pie Cookies, a creative twist on the classic dessert! These soft, buttery cookies are filled with luscious whipped cream and drizzled with rich chocolate glaze, making them an irresistible treat for any occasion. Perfect for birthdays, holidays, or a sweet afternoon snack, these cookies not only look beautiful but taste amazing too. With straightforward steps and simple ingredients, even beginner bakers can master this recipe.
Ingredients
- 1 cup unsalted butter
- 1 cup granulated sugar
- 2 large eggs
- 1 teaspoon vanilla extract
- 2 cups all-purpose flour
- 1 teaspoon baking powder
- 1/2 teaspoon baking soda
- 1/4 teaspoon salt
- For the filling: 1 cup heavy cream
- 1/2 cup powdered sugar
- 1 teaspoon vanilla extract
- For the glaze: 1 cup semi-sweet chocolate chips
- 1 tablespoon vegetable oil
Instructions
- Cream together softened butter and sugar until fluffy.
- Add eggs one at a time, mixing well with vanilla extract.
- In another bowl, whisk flour, baking powder, baking soda, and salt; gradually combine with wet ingredients.
- Chill dough for at least 30 minutes.
- Preheat oven to 350°F (175°C) and prepare baking sheets.
- Scoop dough onto sheets and bake for 10-12 minutes or until edges are golden.
- Cool cookies on a wire rack before assembling with whipped cream filling and chocolate glaze.
- Prep Time: 30 minutes
- Cook Time: 12 minutes
- Category: Dessert
- Method: Baking
- Cuisine: American
Nutrition
- Serving Size: 1 serving
- Calories: 180
- Sugar: 12g
- Sodium: 90mg
- Fat: 10g
- Saturated Fat: 6g
- Unsaturated Fat: 3g
- Trans Fat: 0g
- Carbohydrates: 20g
- Fiber: <1g
- Protein: 2g
- Cholesterol: 40mg