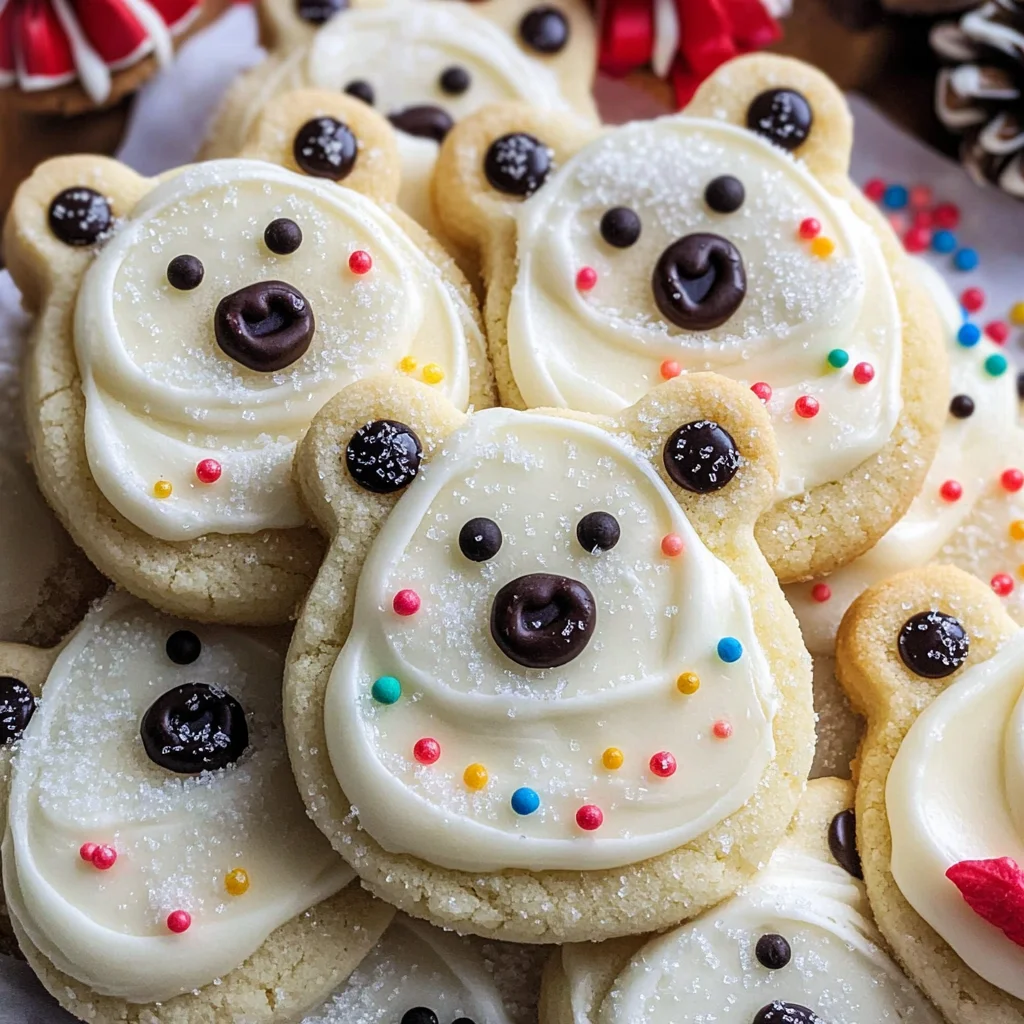
These delightful Polar Bear Cookies are a whimsical treat that’s perfect for any occasion, from festive holidays to cozy winter gatherings. Their soft and chewy texture combined with creamy homemade buttercream frosting makes them an irresistible dessert. Not only are they adorable, but they also bring joy to both kids and adults alike. Whether you’re hosting a party or looking for a fun baking project, these cookies will surely stand out.

Jump to:
- Why You’ll Love This Recipe
- Tools and Preparation
- Essential Tools and Equipment
- Importance of Each Tool
- Ingredients
- For the Cookies
- For the Buttercream Frosting
- For Decoration
- How to Make Polar Bear Cookies
- Step 1: Prepare the Cookie Dough
- Step 2: Bake the Cookies
- Step 3: Make the Buttercream Frosting
- Step 4: Decorate Your Polar Bear Cookies
- How to Serve Polar Bear Cookies
- With a Glass of Milk
- At a Holiday Party
- As Party Favors
- On a Cookie Platter
- With Hot Cocoa
- For Dessert Buffets
- How to Perfect Polar Bear Cookies
- Best Side Dishes for Polar Bear Cookies
- Common Mistakes to Avoid
- Storage & Reheating Instructions
- Refrigerator Storage
- Freezing Polar Bear Cookies
- Reheating Polar Bear Cookies
- Frequently Asked Questions
- How do I make Polar Bear Cookies?
- Can I freeze Polar Bear Cookies?
- What should I do if my dough is too sticky?
- Can I customize the decorations on Polar Bear Cookies?
- What’s the best way to store leftover cookies?
- Final Thoughts
- 📖 Recipe Card
Why You’ll Love This Recipe
- Adorable Presentation: These cookies resemble cute polar bears, making them a hit at parties and celebrations.
- Soft and Chewy Texture: The combination of butter and cream cheese creates a tender cookie that melts in your mouth.
- Versatile for Occasions: Perfect for Christmas, birthdays, or winter-themed events—these cookies fit right in!
- Delicious Homemade Frosting: The buttercream frosting adds an extra layer of flavor that’s simply irresistible.
- Fun to Decorate: Kids will love helping decorate these cookies with chocolate chips and sprinkles.
Tools and Preparation
Before you dive into making these adorable Polar Bear Cookies, gather your tools and prepare your workspace. Having everything on hand will make the process smoother and more enjoyable.
Essential Tools and Equipment
- Mixing bowls
- Electric mixer
- Baking sheets
- Parchment paper
- Cookie cutters (optional)
- Measuring cups and spoons
Importance of Each Tool
- Electric mixer: Ensures that ingredients are thoroughly combined, making the batter light and fluffy.
- Baking sheets: Provides a sturdy base for baking your cookies evenly.
- Parchment paper: Prevents sticking and makes cleanup a breeze.
Ingredients
These adorable buttercream polar bear cookies are incredibly soft and chewy and are topped with the most delicious homemade buttercream frosting.
For the Cookies
- 3/4 cup (1 1/2 sticks) unsalted butter, room temperature (170g)
- 1/2 cup or 4 oz. full fat cream cheese, room temp (113g)
- 1 1/2 cups granulated sugar (300g)
- 1 large egg, room temperature (56g)
- 2 tsp vanilla extract or vanilla bean paste (8g)
- 3 cups all-purpose flour (375g)
- 1 Tbsp cornstarch (8g)
- 1/2 tsp baking powder (2g)
- 1/2 tsp fine salt (3g)
For the Buttercream Frosting
- 1 cup unsalted butter, room temperature (226g)
- 1 Tbsp vanilla extract or vanilla bean paste (12g)
- 1/2 tsp fine salt (3g)
- 3 1/2 cups powdered sugar (454g or 1 lb. box)
- 1/4 cup heavy whipping cream, room temperature (60g)
For Decoration
- 1 cup coarse sanding sugar
- 30 large chocolate chips – I used the Ghirardelli dark chocolate chips
- Round black sprinkles
- Round red or pink sprinkles
How to Make Polar Bear Cookies
Step 1: Prepare the Cookie Dough
- In a mixing bowl, beat together the unsalted butter and cream cheese until smooth.
- Gradually add granulated sugar while mixing until light and fluffy.
- Add in the egg and vanilla extract; mix until well combined.
- In another bowl, whisk together flour, cornstarch, baking powder, and salt.
- Gradually mix dry ingredients into the wet mixture until just combined.
Step 2: Bake the Cookies
- Preheat your oven to 350°F (175°C).
- Line baking sheets with parchment paper.
- Scoop tablespoons of dough onto the prepared sheets, spacing them about 2 inches apart.
- Bake for about 14 minutes or until edges are lightly golden.
- Allow cookies to cool completely on wire racks before frosting.
Step 3: Make the Buttercream Frosting
- In a clean bowl, beat unsalted butter until creamy.
- Gradually add powdered sugar and mix well.
- Pour in heavy cream along with vanilla extract; beat until fluffy.
- Adjust consistency with more cream if necessary.
Step 4: Decorate Your Polar Bear Cookies
- Spread a generous amount of frosting on each cooled cookie.
- Sprinkle coarse sanding sugar over frosted cookies for a snowy effect.
- Place chocolate chips as eyes and use sprinkles for noses to complete your polar bear design.
Enjoy your delightful Polar Bear Cookies at any gathering!
How to Serve Polar Bear Cookies
Polar Bear Cookies are not only delightful but also versatile. They can be enjoyed in various ways, making them perfect for any occasion or gathering.
With a Glass of Milk
- Pairing these cookies with a chilled glass of milk enhances their sweetness and soft texture, making it a classic combination loved by all ages.
At a Holiday Party
- Present these cute polar bear cookies at your next holiday party. Their adorable appearance will surely catch everyone’s eye and add festive cheer to the table.
As Party Favors
- Wrap individual cookies in clear bags tied with ribbons. These make excellent party favors for birthdays or winter celebrations, leaving guests with a sweet memory.
On a Cookie Platter
- Create an impressive dessert platter featuring Polar Bear Cookies alongside other festive treats like sugar cookies and brownies. This colorful display will elevate any gathering.
With Hot Cocoa
- Enjoy these cookies with a warm cup of hot cocoa. The rich chocolate flavor complements the buttery cookies, creating a cozy treat on cold days.
For Dessert Buffets
- Incorporate Polar Bear Cookies into dessert buffets during celebrations. Their whimsical design adds a fun touch to the spread, appealing to both kids and adults alike.
How to Perfect Polar Bear Cookies
Achieving the perfect Polar Bear Cookies requires attention to detail and some handy tips.
- Use room temperature ingredients: Ensure your butter and cream cheese are at room temperature for easy mixing and better texture.
- Chill the dough: Refrigerate the cookie dough for about 30 minutes before baking. This helps them maintain their shape and prevents spreading.
- Measure flour accurately: Spoon flour into your measuring cup and level it off with a knife. Avoid packing it down to ensure you don’t end up with dry cookies.
- Don’t overmix: When combining ingredients, mix just until combined. Overmixing can lead to tough cookies.
- Monitor baking time: Keep an eye on the cookies while they bake; they should be lightly golden on the edges when done.
- Cool properly: Let the cookies cool on the baking sheet for a few minutes before transferring them to wire racks. This ensures they set without breaking apart.
Best Side Dishes for Polar Bear Cookies
Complementing your Polar Bear Cookies with some delicious side dishes can create a well-rounded dessert experience.
- Hot Chocolate: A rich, creamy beverage that pairs perfectly with sweet cookies.
- Fruit Salad: A refreshing mix of seasonal fruits balances the sweetness of the cookies.
- Cheese Platter: Include mild cheeses like brie or gouda that contrast nicely with the sugary flavor of the cookies.
- Mini Cupcakes: Small bite-sized cupcakes can provide variety without overwhelming guests.
- Ice Cream Sundae Bar: Set up an ice cream station where guests can scoop their favorite flavors to enjoy alongside their cookies.
- Coffee or Tea: Offer warm beverages as an option for adults who want something more sophisticated with their sweet treats.
- Chocolate Fondue: A fun interactive dessert idea where guests can dip fruits or marshmallows along with Polar Bear Cookies into melted chocolate.
- Granola Parfaits: Layer yogurt, granola, and fruit for a light yet satisfying side dish that contrasts well with rich desserts like cookies.
Common Mistakes to Avoid
Making Polar Bear Cookies can be a delightful experience, but a few common mistakes can lead to less-than-ideal results. Here’s what to watch out for:
- Bold ingredient mismeasurements: Always use a kitchen scale for accurate measurements. This ensures your cookies turn out perfectly every time.
- Bold neglecting room temperature ingredients: Using cold butter or cream cheese can result in a dense cookie. Make sure all your ingredients are at room temperature.
- Bold overmixing the dough: Mixing too much can lead to tough cookies. Mix just until combined for the best texture.
- Bold skipping the chilling step: If you skip chilling the dough, your cookies may spread too much while baking. Chill the dough for at least 30 minutes before baking.
- Bold not using parchment paper: Baking directly on the tray can cause sticking and uneven browning. Always line your baking sheet with parchment paper.
Storage & Reheating Instructions
Refrigerator Storage
- Store Polar Bear Cookies in an airtight container.
- They will stay fresh in the refrigerator for up to one week.
Freezing Polar Bear Cookies
- Wrap each cookie individually in plastic wrap before placing them in a freezer-safe bag.
- Frozen cookies can last up to three months.
Reheating Polar Bear Cookies
- Oven: Preheat your oven to 350°F (175°C). Place cookies on a baking sheet for about 5-7 minutes until warm.
- Microwave: Heat one cookie at a time on high for about 10-15 seconds for a soft treat.
- Stovetop: Use a skillet on low heat, covering it with a lid for about 2-3 minutes. This method keeps them soft.
Frequently Asked Questions
If you have questions about making Polar Bear Cookies, you’re not alone! Here are some common queries:
How do I make Polar Bear Cookies?
To make Polar Bear Cookies, mix softened butter and cream cheese with sugar, add egg and vanilla, then incorporate dry ingredients. Shape into balls and bake!
Can I freeze Polar Bear Cookies?
Yes! You can freeze Polar Bear Cookies by wrapping them individually and placing them in a freezer-safe container. They maintain their taste and texture well.
What should I do if my dough is too sticky?
If your dough feels too sticky, chill it in the refrigerator for about 30 minutes. This helps firm up the dough for easier handling.
Can I customize the decorations on Polar Bear Cookies?
Absolutely! While round black and pink sprinkles give them character, feel free to use any edible decorations you like to match different themes or holidays.
What’s the best way to store leftover cookies?
Store leftover cookies in an airtight container at room temperature or refrigerate them for extended freshness.
Final Thoughts
Polar Bear Cookies are not only adorable but also incredibly delicious! Their soft and chewy texture paired with sweet buttercream frosting makes them perfect for any occasion. Feel free to customize these cookies with different toppings or flavors to suit your taste preferences. Give this recipe a try; you won’t be disappointed!
Did You Enjoy Making This Recipe? Please rate this recipe with ⭐⭐⭐⭐⭐ or leave a comment.
📖 Recipe Card
Print
Polar Bear Cookies
- Total Time: 34 minutes
- Yield: Approximately 24 cookies 1x
Description
Indulge in the whimsical charm of Polar Bear Cookies, a delightful treat that brings joy to any gathering. These soft and chewy cookies are adorned with creamy homemade buttercream frosting, creating an irresistible dessert perfect for festive occasions or cozy winter nights. Their adorable polar bear design captivates both kids and adults, making them a show-stopping addition to holiday parties, birthdays, or simply as a fun baking project. With simple ingredients and easy-to-follow steps, these cookies are not only enjoyable to make but also a sweet token of affection to share with friends and family.
Ingredients
- 3/4 cup unsalted butter, room temperature
- 1/2 cup full fat cream cheese, room temperature
- 1 1/2 cups granulated sugar
- 1 large egg, room temperature
- 2 tsp vanilla extract or vanilla bean paste
- 3 cups all-purpose flour
- 1 Tbsp cornstarch
- 1/2 tsp baking powder
- 1/2 tsp fine salt
- 1 cup unsalted butter, room temperature (for frosting)
- 1 Tbsp vanilla extract or vanilla bean paste (for frosting)
- 1/2 tsp fine salt (for frosting)
- 3 1/2 cups powdered sugar (for frosting)
- 1/4 cup heavy whipping cream, room temperature (for frosting)
- 1 cup coarse sanding sugar (for decoration)
- 30 large chocolate chips (for decoration)
- Round black sprinkles (for decoration)
- Round red or pink sprinkles (for decoration)
Instructions
- Preheat your oven to 350°F (175°C) and line baking sheets with parchment paper.
- Beat together softened butter and cream cheese until smooth; gradually add sugar until light and fluffy.
- Mix in the egg and vanilla extract until combined.
- In another bowl, whisk together flour, baking powder, cornstarch, and salt; then gradually mix into the wet ingredients.
- Scoop tablespoon-sized portions of dough onto prepared sheets, spacing them apart.
- Bake for 14 minutes or until edges are lightly golden; cool completely on wire racks.
- Prepare the buttercream frosting by beating softened butter with powdered sugar until creamy; add heavy cream and vanilla.
- Frost the cookies generously and decorate with chocolate chips for eyes and sprinkles for noses.
- Prep Time: 20 minutes
- Cook Time: 14 minutes
- Category: Dessert
- Method: Baking
- Cuisine: American
Nutrition
- Serving Size: 1 cookie (30g)
- Calories: 150
- Sugar: 12g
- Sodium: 85mg
- Fat: 6g
- Saturated Fat: 3g
- Unsaturated Fat: 2g
- Trans Fat: 0g
- Carbohydrates: 22g
- Fiber: 0g
- Protein: 2g
- Cholesterol: 25mg